
To change the row height in Google Sheets, left-click with the mouse on the bottom edge of the row and drag downward or upward to adjust it to the desired height.
But this is just one of multiple ways to do it. That’s why we created this ultimate guide to managing row height in Google Sheets.
Use the table of contents below to navigate the article and find the solution that works best for you.
3 Quick Ways to Adjust Row Height
In Google Sheets, there are always multiple ways to tackle any task, and changing row height is not an exception.
Essentially, there are three quick ways to get the job done.
1. Using the Mouse Option
This is a simple process and, perhaps, one you will eventually use most often to resize your spreadsheet’s row height.
Follow these steps to increase or decrease the row height on your document:
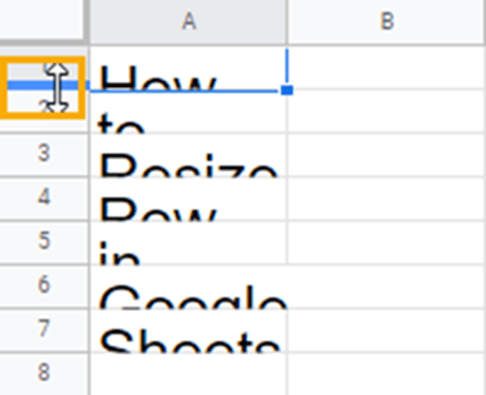
1. Place the mouse on the lower part of the row that you want to adjust. When you do this, two things will happen. First, the mouse arrow will become a double-headed arrow. Second, a thick blue line will appear at the bottom part of the selected row just like in the image below.
 2. Press and hold the left button on your mouse and drag downward to increase row height or drag upward to reduce row height.
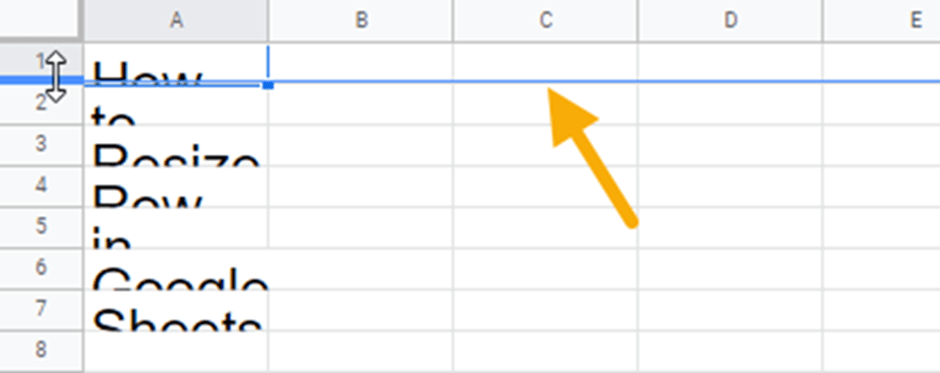
When you press and hold the left mouse button, a blue line will appear that reaches the other end of the spreadsheet. You can use this as an indication that you’re doing it right.
Follow these steps to change the height of each row so the cell contents can show properly.
2. Using the “Resize Rows” Feature
The Resize Rows feature allows you to be precise with how much you want to change the row height.
Google Sheets measures the amount of space between the top and bottom border of each row in pixels. When you use the Resize Rows option, simply enter the number of pixels you want for the height of each row.
This is a tad better than using the mouse to change the row height because you can have evenly resized rows with the Resize Rows method.
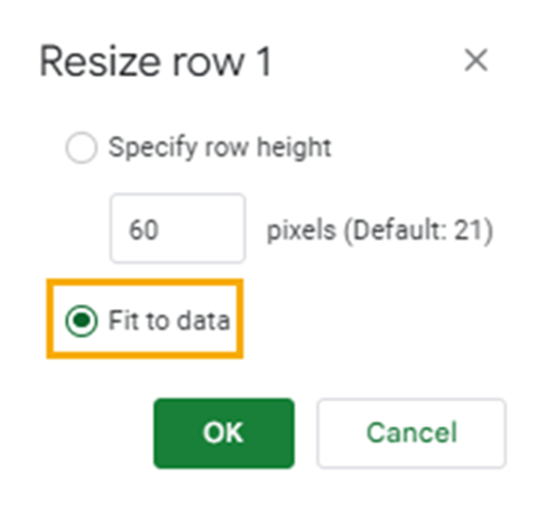
Also, you can use the Resize Rows feature to fit the row to accommodate the data in the cells.
Follow these steps to use the Resize Rows option:
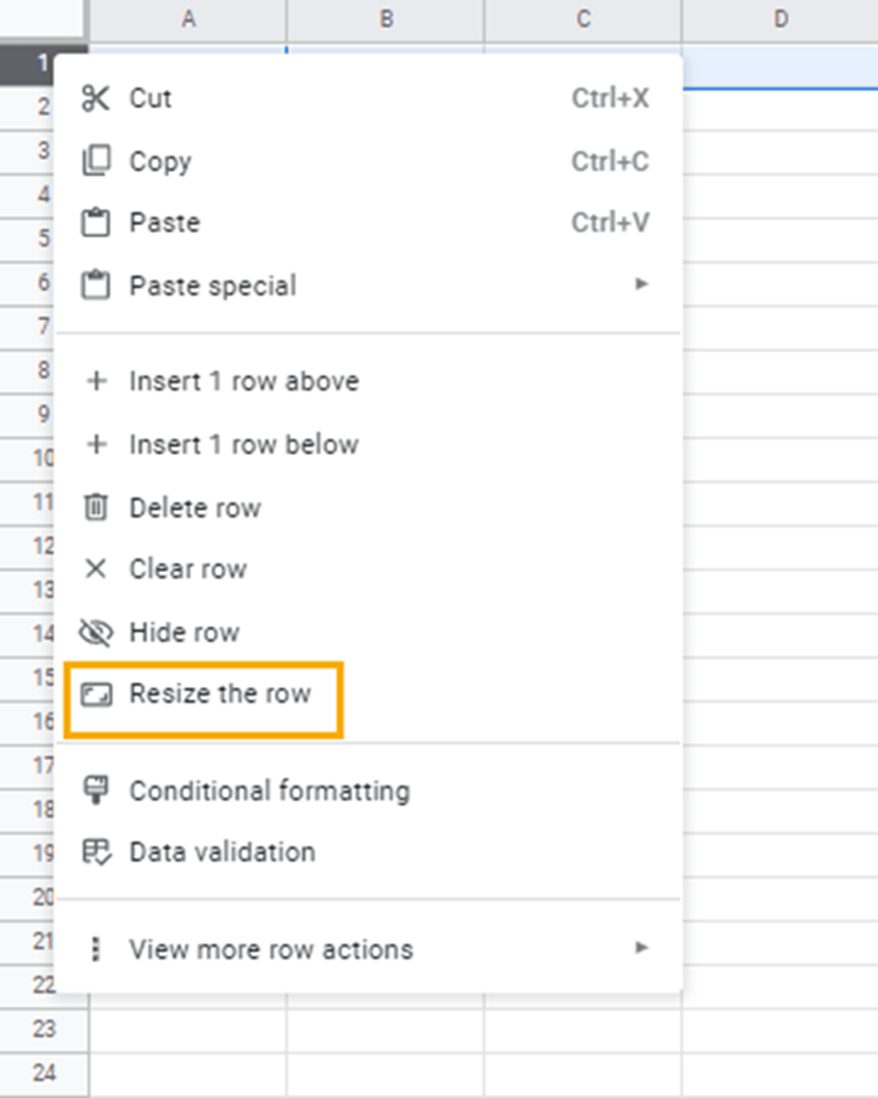
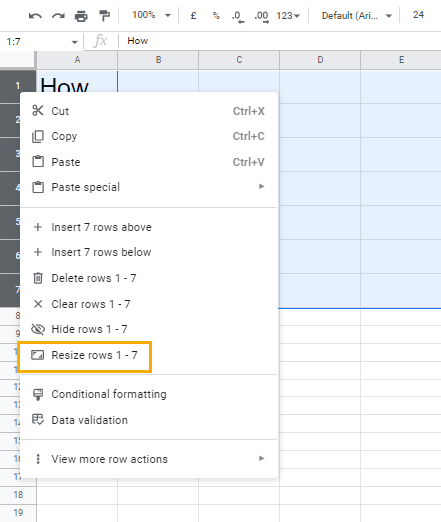
1. Select a row (or rows) you want to resize by clicking on the row number and pressing the right mouse button. Alternatively, you can place your mouse on the row number you want to resize and simply right-click.
2. From the menu that appears, select the option Resize the row.
 3. In the next dialogue box, delete the number in the Specify row height text box and enter the number of pixels you want to define the row height.
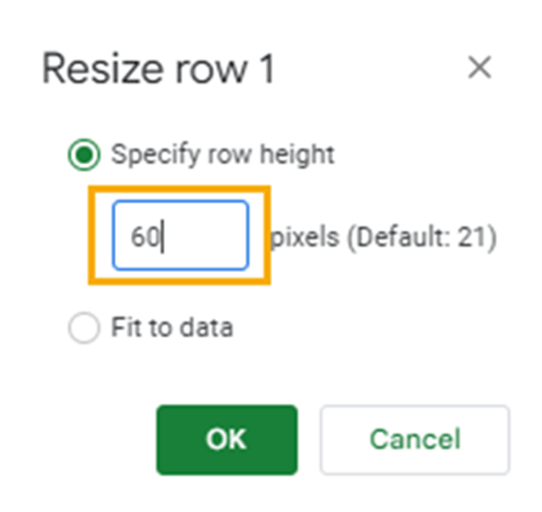
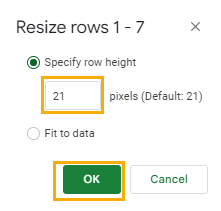
Specify row height is always the default selection. You can click on the Fit to data radio button to use the other option. You won’t need to specify a pixel number for the Fit to data option because the spreadsheet will fit the row to the cell with the highest pixels.
When you’re done with this step, click on OK to exit the window.
You can follow these steps to resize each row accordingly.
3. Using the Double-click Method
The last popular and one of the easiest ways to change row size is to use the double-click method. With this option, you simply double-click the bottom of the selected row to change the row size. The double-click method is the same as the Fit to data option in the Resize Rows feature. They both autofit the row height to the text in the cell.
Here’s how you use it:
Place your mouse on the bottom border of the row you want to resize, just like when you use the mouse method. Then, when the double arrow appears, double-click the left mouse button.
- Pro Tip 1 (Resizing Multiple Rows): You can resize multiple rows at once. To select multiple rows, press and hold the Shift button while using the mouse or arrow keys to select multiple consecutive rows or use the Ctrl button and the mouse to select non-consecutive rows. This tip works with all the methods discussed above and allows all selected rows to be evenly resized with each other.
- Pro Tip 2 (Resizing All Rows in a Sheet at Once): To do this, use Ctrl + A to select all the cells in a sheet, then use the mouse or the double-click method. The Resize Rows option is greyed out when you select all the cells in the sheet, so you can’t use it.
How to Autofit Row Height
Both the double-click and the Fit to data options autofit rows to accommodate their content. One more method is useful for autofitting data: using a line break.
To add a line break, use the shortcut Alt + Enter. Using this combination will increase the height of the row and autofit the row to contain the row’s content, including white spaces.
How to Resize Cells to the Default Row Height
You can resize rows to the default height by using the Resize Rows method mapped out above.
1. Open the Resize row dialogue box by selecting the rows that you want to resize, right-clicking anywhere on the selected area, and choosing “Resize rows” from the contextual menu that appears.
2. In the “Specify row height” field, type “21” to set the row height value back to default and click on OK to apply the change.
How to Copy Row Height
You may want to maintain the same row height for all cells in your spreadsheet. One way to do this is to identify the height of the rows in pixels from the Resize row window and replicate this across other cells.
You can as well just perform a simple copy and paste. Here’s how to do it:
1. Identify the row height you want to use, then select and copy it.
2. Go to the destination and select the ranges where you would like to paste the copied data.
3. Paste the copied data.
Note that for this method, you can only copy and paste row height within the same sheet.
How to Change the Row Height with Google Apps Scripts
Creating an apps script can greatly simplify the process of changing a Google Sheets spreadsheet row height. You can create an apps script from a recorded macro, although performance issues can prevent it from running properly in different situations.
Alternatively, you can simply copy and paste this code into your apps script editor window:
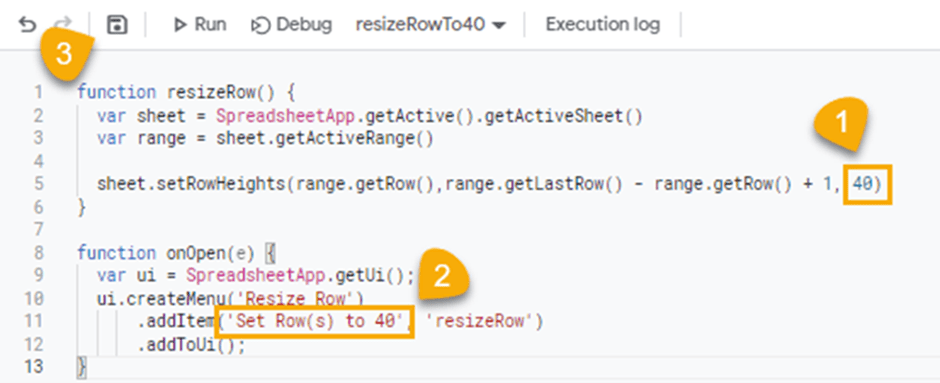
function resizeRow() {
var sheet = SpreadsheetApp.getActive().getActiveSheet()
var range = sheet.getActiveRange()
sheet.setRowHeights(range.getRow(), range.getLastRow() – range.getRow() + 1, 40)
}
function onOpen(e) {
var ui = SpreadsheetApp.getUi();
ui.createMenu(‘Resize Row’)
.addItem(‘Set Row(s) to 40’, ‘resizeRow’)
.addToUi();
}
When you reload the spreadsheet, the script creates a new menu that you can use to resize the row to 40 pixels.

You can use the custom menu to easily set the row height to 40 by selecting the rows you want to change and clicking on the “Set Row(s) to 40” option from the custom “Resize Row” menu.
If you want to change the number of pixels for this option, you just need to adjust a few things in the script. Follow these steps to make the changes:
1. Insert your preferred number of pixels.
2. Change the name of the custom menu to reflect the new row height.
3. Save the changes.
When you’re done, reload your spreadsheet.
Troubleshooting Row Height Issues in Google Sheets
Row Height Won’t Change: Possible Reasons
There are a couple of reasons why the row height won’t change.
1. You might be trying to autofit a row that’s already at maximum. Remember, autofitting sets the row height using the cell with the highest pixel. You will need to inspect your data to identify the cell dictating the row height. This is particularly important when your data spans multiple columns such that you need to scroll left or right.
2. Sheet protection is another reason the row height won’t change. When a user adds protection to a sheet or specific cells without granting you permission access, you won’t be allowed to edit the protection regions, including changing row height.
How to Keep Row Height Cell from Increasing
You can keep the row height for a cell from increasing by protecting the range or cell.
How to Change Row Height If My Mouse Isn’t Working
If your mouse isn’t working, you can use keyboard navigation to change the row height in Google Sheets.
Follow these steps to change row height without using the mouse:
1. Select the row(s) you want to change using the keyboard shortcut Shift + Space. To select multiple rows, hold down the Shift button and use the arrow keys to select consecutive rows. Then use the shortcut Shift + Space.
2. After selecting the rows, use the combination Fn + right Ctrl button to open the right-click menu. This will open the right-click menu from where you can select the Resize Rows option using the arrow keys.
3. In the Resize Row dialogue box, the Specify row height option is selected by default. If not selected, press the Tab key until you can edit the number in the textbox.
4. After entering the row height you want, Tab to select the OK command and press enter.
Row Height Will Not Auto-Adjust to Fit Content Anymore
Row height doesn’t auto-adjust to fit the content. This functionality was discontinued after recent updates. You have to manually change row heights using any of the methods described above.
Row Height in Google Sheets: FAQs
What is the default row height in Google Sheets?
The default row height in Google Sheets is 21 pixels.
Can I lock row height?
Yes, you can lock row height by using the sheet protection feature to prevent editing on specific cells or sheets.
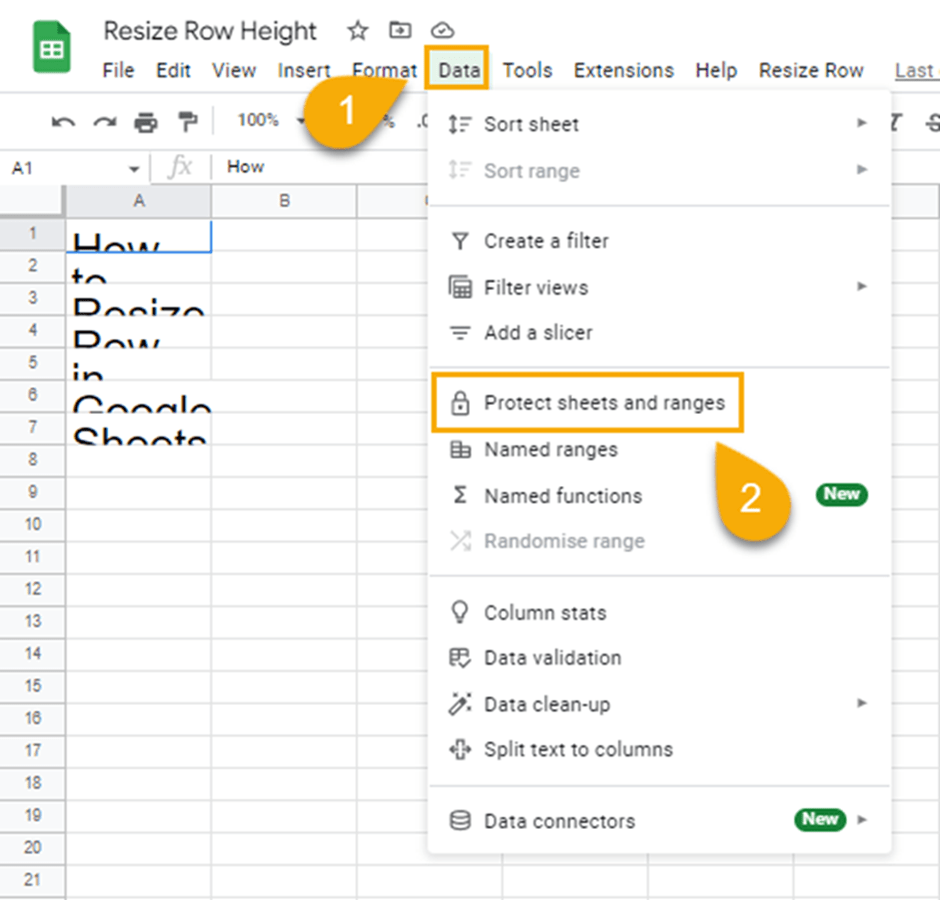
To use sheet protection, follow these steps:
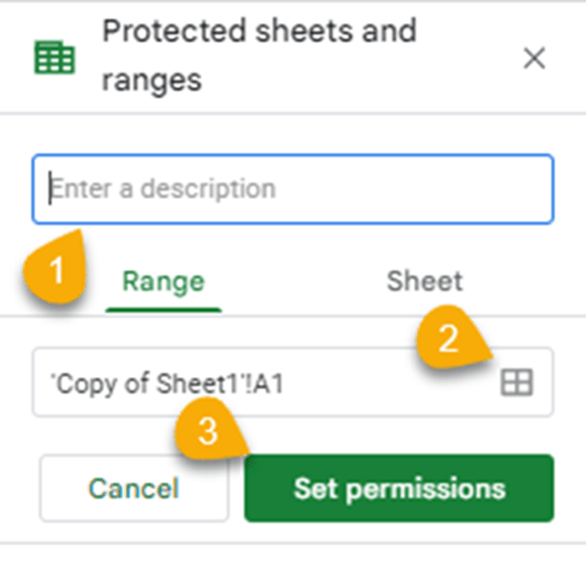
1. Click on the Data menu and select Protect sheets and ranges.
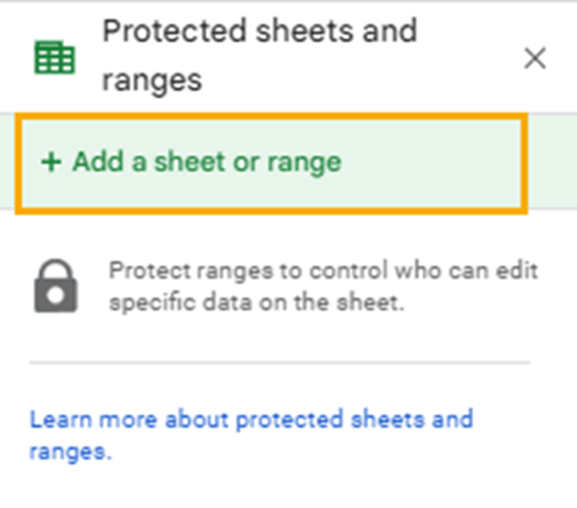
2. From the Protected sheets and ranges window that opens on the right side of your spreadsheet, click on Add a sheet or range option.
 3. Enter a description for the protection and use the grid icon to select the cells you want to protect. Select Set permissions.
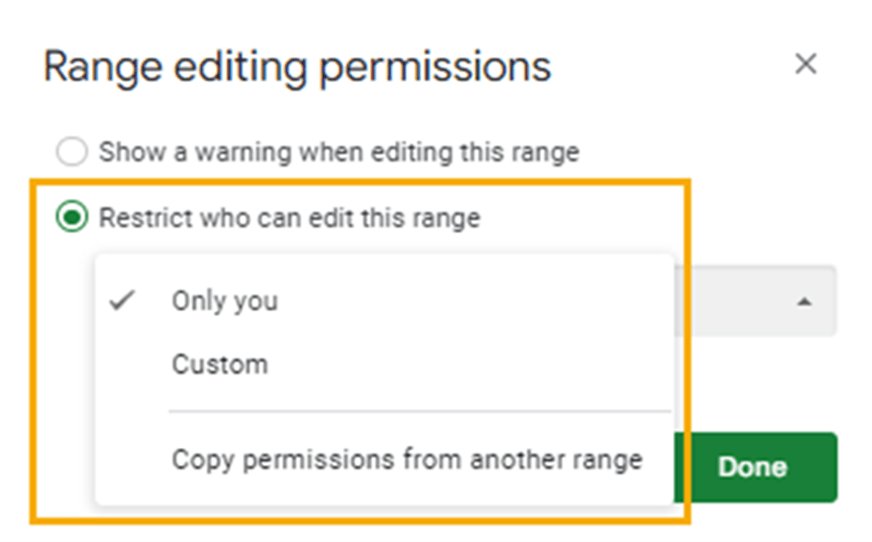
 4. Select the “Restrict who can edit this range” option from the Range editing permissions window. You can set it so that only you can edit the range. The custom option allows you to add other users who will have editing permissions. You can also choose to use permissions used in other ranges.
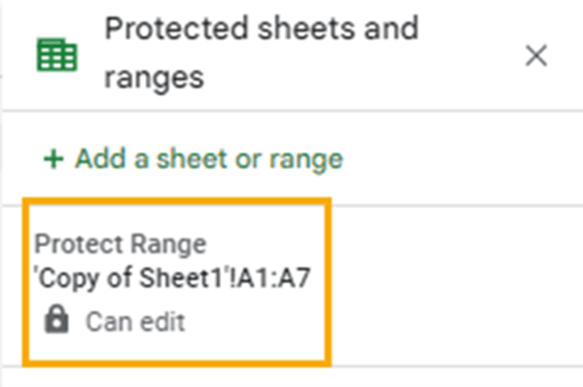
Click Done when you’ve added the permission settings.
Now that the range is locked, only those with editing permissions can change the row height of the locked ranges. It also means they cannot alter anything inside the protected ranges.
How can I make rows stay one line in height?
Rows are, by default, set to a one-line height dimension, and they stay that way unless you make changes.
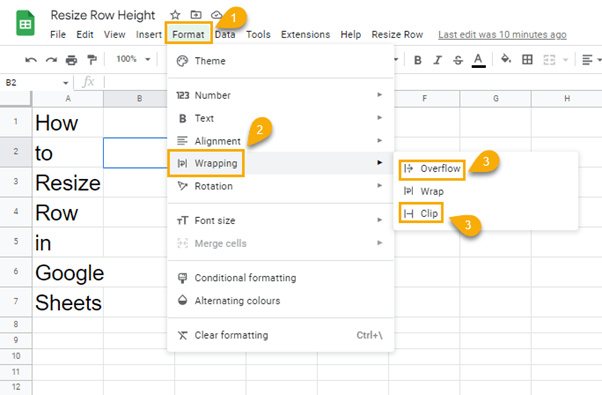
How do I prevent Google Sheets from automatically resizing row height?
Google Sheets doesn’t automatically resize row height unless you have text wrapping turned on, in which case you will need to change the text wrapping setting.
Follow these steps to change text wrapping settings:
1. Go to the “Format” menu.
2. Select “Wrapping.”
3. Click on “Clip” or “Overflow.”
Can I set a minimum row height?
No. You can’t set a minimum row height in Google Sheets.
Can I use percentages to set row height?
You can only use integers to set row height. Using percentages will return an error.
