
If you live and breathe spreadsheets just like us, incrementing cell values is a simple task you’ll inevitably come across at some point in your career.
Stick around to learn how to increment cell values in Google Sheets in different ways, from using the fill handle to leveraging built-in functions and custom formulas.
This gigantic 4000-word monstrosity of a post covers the task from every possible angle, so use the table of contents to navigate the article.
How to Increment Cell Values Using the Fill Handle
The Fill Handle tool is the easiest way to add an increment to your cell reference value.
The tool allows you to automatically increase the value in the next cell by one (or by a certain custom value).
As you drag the fill handle across the rows, Google Sheets will keep incrementing the values for each cell until you stop dragging your mouse cursor.
Follow the steps below to increment cell value using the fill handle in Google Sheets.
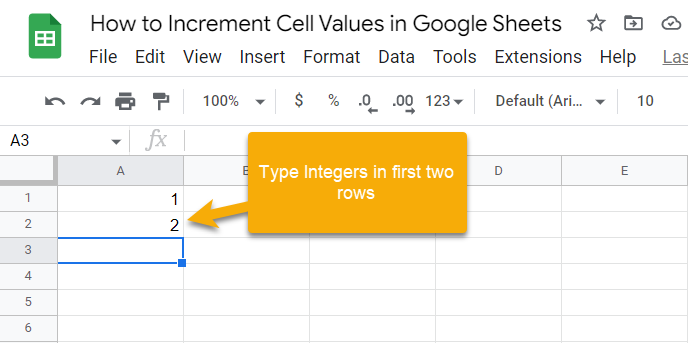
1. In the first two rows of your Google spreadsheet, type any consecutive values you want to increment. The difference between these two numbers will be used as a step to increment the values.
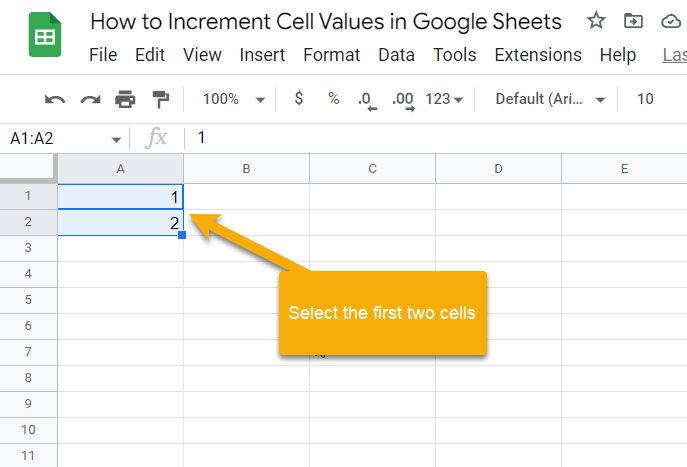
2. Select the two cells containing the numbers for the blue box highlighting the selected cells to appear.
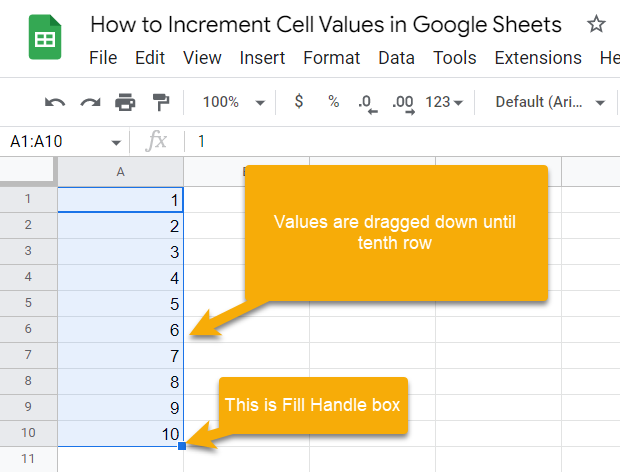
3. Now, click the fill handle (the blue square at the bottom left corner of the selection area) and drag it down to populate the empty cells below with the incremented values.
That’s it! You will see that the cells are filled with the incremented cell values in the first ten rows, as shown in the screenshot below:
- Note: You must manually add the first two values for this method to work.
- Pro tip #1: You can double-click on the fill handle instead of dragging it down to achieve the same outcome.
- Pro tip #2: Alternatively, you can increment cell values using only one cell by selecting the first cell (A1) and holding down the Ctrl key when dragging the fill handle.

How to Create a Custom Formula to Increment Values
If the Fill Handle method covered above is not something you want to deal with, using a custom formula that can do the heavy lifting will be a godsend for you.
Using custom formulas, generally, gives you more flexibility and customization options as it’s a more dynamic way to increment cell values, making it superior to the fill handle method.
And the formula we’re going to show you below is super simple to execute.
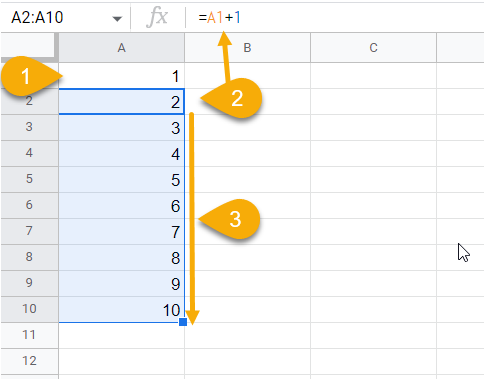
1. Type any number in the first cell (A1) based on which the increment should happen in the subsequent cells.
2. In cell A2, type “=A1+1”. Feel free to copy and paste it directly into cell A2 of your Google spreadsheet.
3. Finally, select cell A2 and drag the fill handle to execute the formula for the empty cells below.
How to Use Built-in Functions to Increment Values
There are always multiple ways of doing a given task in Google Sheets. When it comes to incrementing values, using built-in functions is an alternative way to get the job done.
Here are three essential functions you can leverage to increment the cell values in Google Sheets:
- ROW
- COLUMN
- SEQUENCE
ROW
If you want to use built-in Google Sheets functions to auto-increment cell values, the ROW function should be the first one to resort to.
The syntax of the ROW function is shown below:
=ROW([cell_reference])
The function has only one optional argument named cell_reference, which, if provided, will return the row number of the specified cell.
To use the ROW function to increment cell values, we will use a custom formula made of two ROW functions.
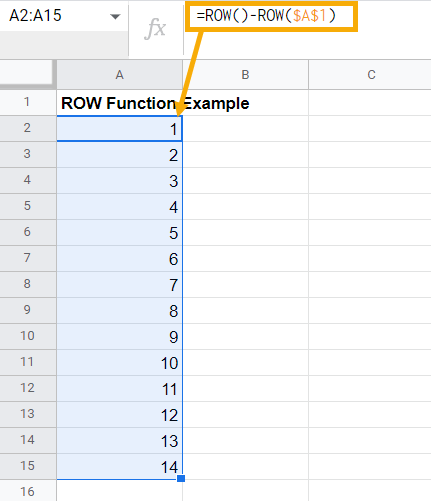
1. In cell A2, type the following formula to set your starting value to “1.”
=ROW()-ROW($A$1)
In this formula, the first ROW function captures the row number of cell A2 (which is “2”). Then, the second instance of the ROW function subtracts 1 from each row number using the absolute cell reference to generate the output we want.
2. Once you copy the formula into your spreadsheet, drag the formula down to auto-increment the starting value.
Pro Tip: If you want to increment the starting value by 2, just use $A$2 as the absolute cell reference in the formula.
COLUMN
The COLUMN function works in a similar way to the ROW function. The only difference is how the output is processed. The ROW function generates row-wise output while the COLUMN function returns column-wise output.
The syntax of the COLUMN function is as follows:
=COLUMN([cell_reference])
Where,
Cell_reference represents the cell from which the column number is extracted. It is an optional argument and can be skipped.
Follow the steps below to increment the cell values column-wise using the COLUMN function.
1. Type the following formula in cell A2, which returns the column number of the specified cell.
=COLUMN()
2. Now, drag the formula across row 2 to generate incremental cell values.
See the screenshot below to get the gist of how the function works in practice:

Note that you don’t need to make the adjustment the way we did when using the ROW function, and the reason is simple. Whatever row we execute the COLUMN function for, the column number remains the same.
However, if you run the formula from column B onwards, you will need to adjust the function the same way we did for the row-wise incremental values above when using the ROW function to ensure the starting value equals 1: =COLUMN()-COLUMN($A$2).
SEQUENCE
The SEQUENCE function in Google Sheets is one of a kind. It has the power to generate numbered sequences and falls under the category of array functions. When called, even in a specific cell, it creates an array of numbers.
Let’s break down the syntax of the SEQUENCE function:
=SEQUENCE(rows, [columns], [start], [step])
where
- rows – represents the number of rows to be shown in the output. This argument is required. For example, if you set the rows argument to “15,” the SEQUENCE function returns a sequence of fifteen values.
- columns – represents the number of columns the sequence should return. It is an optional argument, and the default value is set to one column.
- start – represents the starting value. It is also an optional argument with a default value set to 1.
- step – is an optional argument that specifies the increment value of your sequence. The default value is also set to 1.
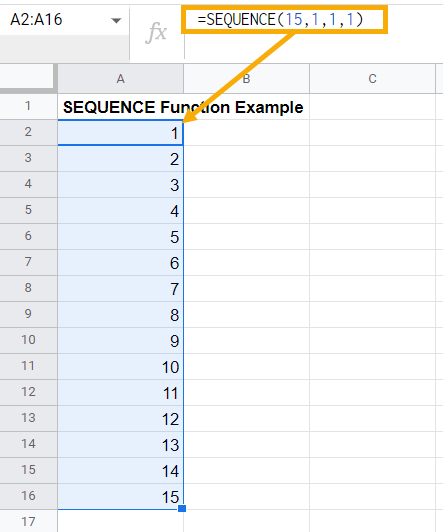
To increment cell values using SEQUENCE, type the following function in cell A2:
=SEQUENCE(15,1,1,1)
As a result, a sequence of 15 numbers is generated, starting from 1 and incrementing by one step with each execution of the function.
Here’s the in-depth breakdown of the function used above:
- In this function, we want to create a sequence with 15 rows. Therefore the rows argument is set to 15.
- For the columns argument, we wanted a sequence that takes up only one column, so the value is set to 1.
- For the start argument, we want the sequence to start from 1. However, if you want to use something else, simply replace this value with your number.
- The step argument is set to 1 since we want to increment our values by this number. However, you can customize it however you see fit to customize the output.
Note: The formula above can also be replaced with =SEQUENCE(15). It will generate the same output as shown in the screenshot below. This is possible because the columns, start, and step arguments are set to 1 by default.
Note #2: There is also one benefit of using the SEQUENCE function over other functions that we haven’t discussed. Since it is an array function, you don’t need to drag it across the rows. The function will automatically take the first argument and generate the output as an array that spans across the number of rows based on the rows argument.
Real-World Examples of Incrementing Cell Values in Google Sheets
Now that you know all the ways to increment cell values in Google Sheets, it’s time to go through some of the most common examples that you might come across in your day-to-day work life.
How to Increment a Cell Value by 1
Incrementing a cell value by 1 is a common task, and we have demonstrated several ways to do that above.
My personal favorite is the SEQUENCE function, which can reliably increment your value by any given number.
But, instead of rehashing the methods already covered above, I’m going to show you how you can use the SUM function to increment your cell value by 1 to add another arrow to your quiver.
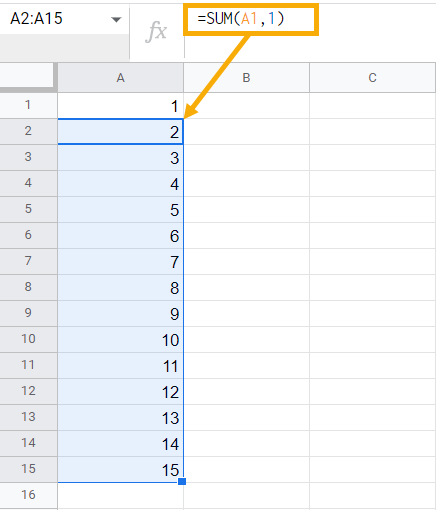
1. In cell A1, manually type the number 1, which will be our starting value.
2. In cell A2, type =SUM(A1,1). This function grabs the value from the specified cell and adds 1 to it.
3. Drag the formula down to see the values in column A get incremented by 1.
How to Increment a Cell Value by a Given Percentage Point
Incrementing a certain value by a certain percentage point in Google Sheets is a pretty common scenario regardless of the industry you work in.
For illustration purposes, we’ll show you how to increment a cell value by 5% (or, for that matter, any percentage).
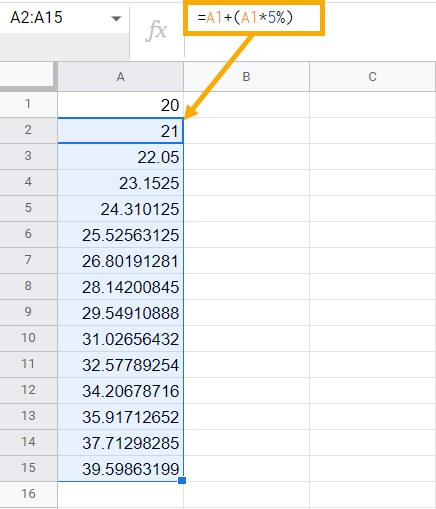
1. In cell A1, type any value that you want to increment by 5%. In this example, we’re going to type “20.”
2. In cell A2, type the following formula:
=A1+(A1*5%)
The second part gets executed first and returns 5% of the value in cell A1 (20*5%=1). Then, this value is added back to the value from cell A1.
Drag the formula down across the rows to generate a sequence of 15 numbers. Each one is incremented by 5% of the cell above it. See the output below.
How to Increment Cell Value by a Value in Other Cell, Variable, or Cell Reference
This is another exciting scenario where you want to increment cell value by value in another cell. Suppose you work for the HRMS department, and New Year is just around the corner.
Management wants to give $5,000 as an annual bonus to all of the employees, so you want the salary number of each employee to be increased by 5,000.
Here’s how you can increase each value in your data set by 5,000 by putting that number in a specific cell and using it as a cell reference in your formula.
Based on the table below, let’s assume the values column A represent the employee salary numbers while the value in cell B2 represents the year-end bonus that we want to add to each salary from column A. The sum of these two values should be returned in column C.
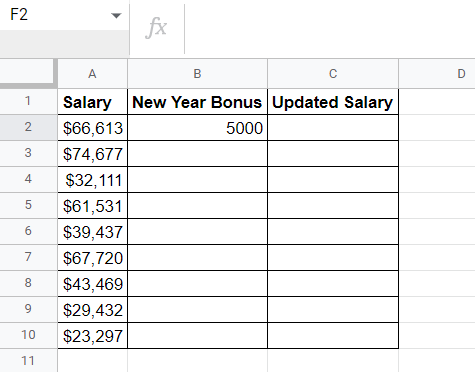
1. In cell C2, use the following formula to return the salary number incremented by the value in cell B2.
=SUM(A2,$B$2)
2. Drag the formula down across column C to get the incremented cell values.
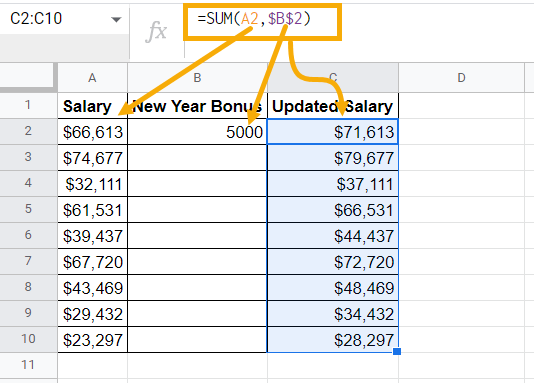
In this example, the SUM function takes the value in cell A2 (the original salary) and increments it with value in cell B2 (the year-end bonus).
We use an absolute cell reference in cell B2 in this formula since we want to increment the salary numbers by the same value each time the function is executed.
How Increase a Cell Value 1 Increment Every X Row
Most of the time, you want to increment your value every time your function is executed.
But have you ever tried to increment cell value every nth row? For example, increment the cell value every three rows? Here’s how you do it.
1. In cell A1, type the following formula. You can also copy and paste it directly into the cell.
=INT((ROW()-1)/3)+1
2. Drag this formula down across the rows to see the output where an increment happens after every three rows.
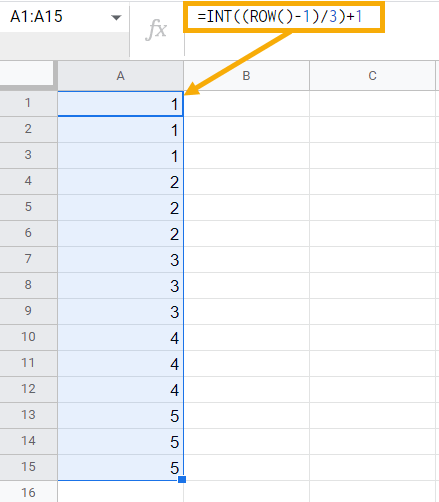
In this example, the ROW() function returns the row number of the cell in which the formula is executed. Once there, the function subtracts 1 from that row number.
Since we want the increment to happen after every three rows, the formula divides the values we grabbed by 3. After the division, you will get the values containing decimal points. To offset that, we’re using the INT function to only capture the integer part of the formula output. Finally, the formula adds 1 to the entire formula to automatically increase the cell value by 1 every three rows.
Pro Tip: If you want to increment the cell value after any nth row, simply replace 3 by either 5, 10, or any other number to increment the cell value after every 5th, 10th, or nth row.
Pro Tip #2: You can also increment your values by any number. In the addition operator, replace 1 with either 5 or 10 to increment cell value by 5 or 10 every nth row.
How To Increment Dates
Occasionally, you may find yourself in a situation where you need to increment date values in Google Sheets. This section will show you how.
How To Increment a Date By One Day
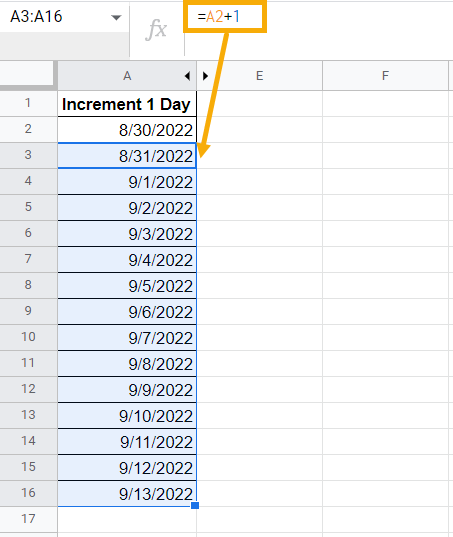
1. Type in your starting date manually in cell A2.
2. In cell A3, use the formula =A2+1 to increment the specified date value by one day.
3. Drag this formula down across the rows to increment the date by one day each time the formula is executed.
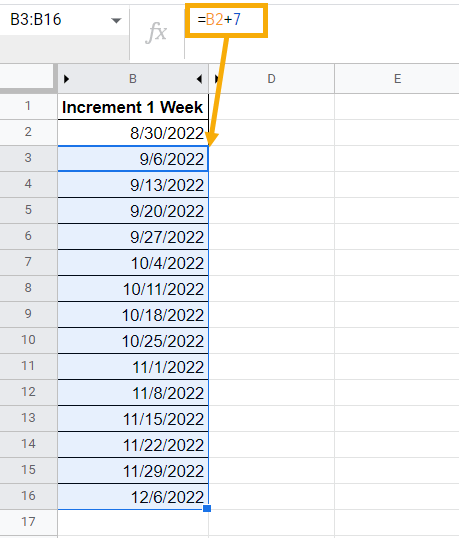
To Increment A Date By One Week
1. In cell B2, enter your starting date.
2. In cell B3, type =B2+7 to add seven days to the starting date, effectively increasing the cell value by a week.
3. Drag the formula down across the rows to see the values get incremented by a week.
How To Increment a Date in One Month
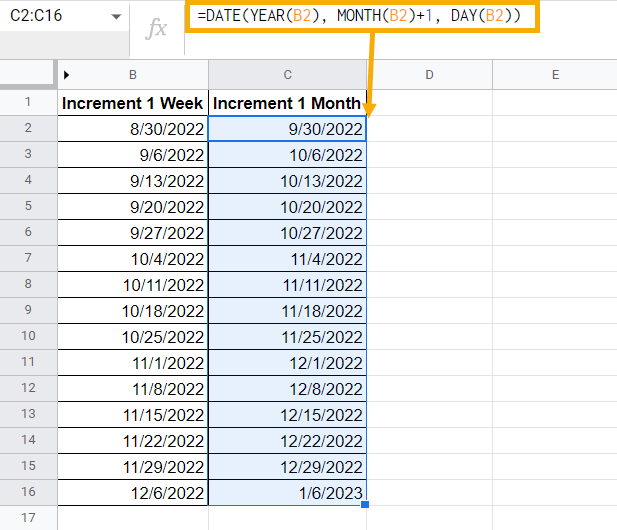
1. Type the following formula in cell C2:
=DATE(YEAR(B2), MONTH(B2)+1, DAY(B2))
The formula above breaks down a given date value into years, months, and days and adds one month to the value extracted with the MONTH function, effectively incrementing the cell value by one month.
2. Drag the formula down across the rows to increment your date values by one month.
How To Increment A Number In A String
Let’s assume you have a table containing employee data and are looking for a quick way to generate employee IDs.
Some IDs contain both text and numeric values, making it hard to manipulate them in Google Sheets.
This is where a substring in Google Sheets comes into play, allowing you to single out the numeric part of the ID. But how do you increment the value within the substring?
Here’s how:
1. In cell A1, type the first employee ID manually to specify your starting value.
2. In cell A2, either type in or copy and paste =CONCAT(LEFT(A1,2), RIGHT(A1,3)+1). This formula extracts the numeric value from the ID and increments it by 1.
3. Drag the formula across the rows to generate the IDs with incremented numerical values from the string.
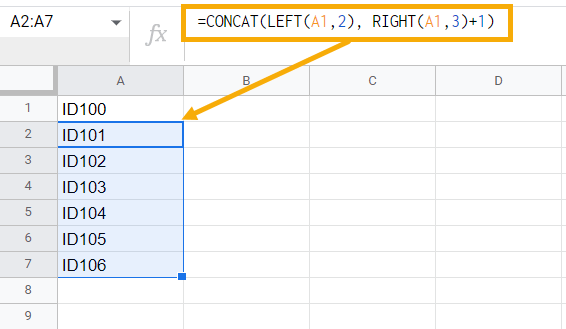
In this custom formula, the LEFT function takes the text from A1 as an argument and extracts the two letters (“ID”) from it.
The RIGHT function takes the three numbers from a given ID and increments it by 1.
Finally, two of these formulas are combined using the CONCAT function, which concatenates the output generated by these formulas and returns the incremented ID in full.
How To Increment Time
You can increment time values in Google Sheets using a custom formula based on the TIME function by following these steps:
1. In cell A2, type in a timestamp value of your choice. For illustration purposes, we’re going to use 12:20:15 PM.
2. In cell A3, enter =A2+TIME(0,0,10). This formula increments the timestamp value by 10 seconds.
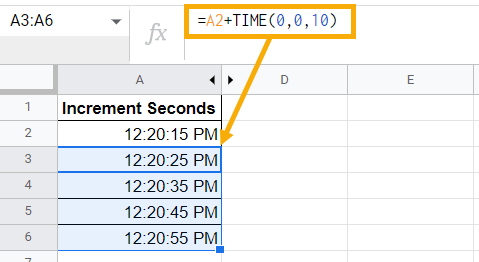
This formula allows you to convert the numeric values in your cell into a timestamp. The TIME function consists of three arguments representing hours, minutes, and seconds respectively.
As shown in the formula above, the hour and second argument are set to 0 because we only want to increment the value by 10 seconds, but you can use it to increment by hours and minutes as well.
How to Increment Hexadecimal Values
Incrementing a hexadecimal value is a pretty uncommon task, but if you ever need to increment it, we’ve got you covered.
Suppose you have a four-digit hexadecimal value 15D9 which you want to increment by 1 automatically every subsequent row.
1. In cell A1 of your sheet, enter your starting hexadecimal value.
2. In cell A2, type the following formula that allows you to increment this hexadecimal value and copy it down to generate the incremented values.
=ARRAYFORMULA( DEC2HEX( SEQUENCE( 20, 1, HEX2DEC(A1) + 1, 1 ) ) )
Here’s the output of the formula:
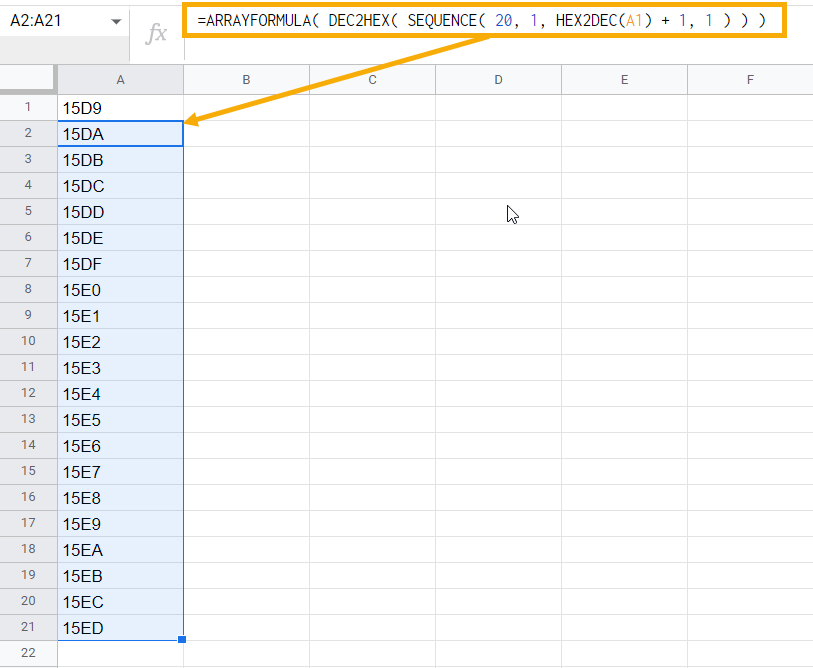
The HEX2DEC function converts the hexadecimal value from cell A1 to a decimal value. Then, the SEQUENCE function creates a sequence of 20 decimals, each incrementing by 1.
Once there, this sequence of 20 numbers is used as input for the DEX2HEX function, which converts the decimal values back to hexadecimal values. Finally, the ARRAYFORMULA function is used to create an array of 20 cells.
How to Increment a Cell Value in AppScript
On top of using functions, formulas, and the fill handle, it’s possible to increment cell values using Apps Script.
Apps Script is a JavaScript-based automation tool that allows you to automate tasks in Google Workspace. It works with all the tools in the Google Workspace suite, including Google Sheets, Gmail, and Google Docs.
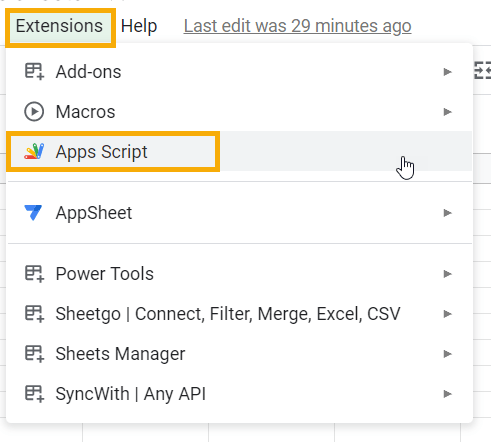
To get started, you need to launch Apps Script in your web browser.
Go to the Extensions menu in your Google Sheets and choose Apps Script. Once there, a new browser window will pop up with the Apps Script environment.
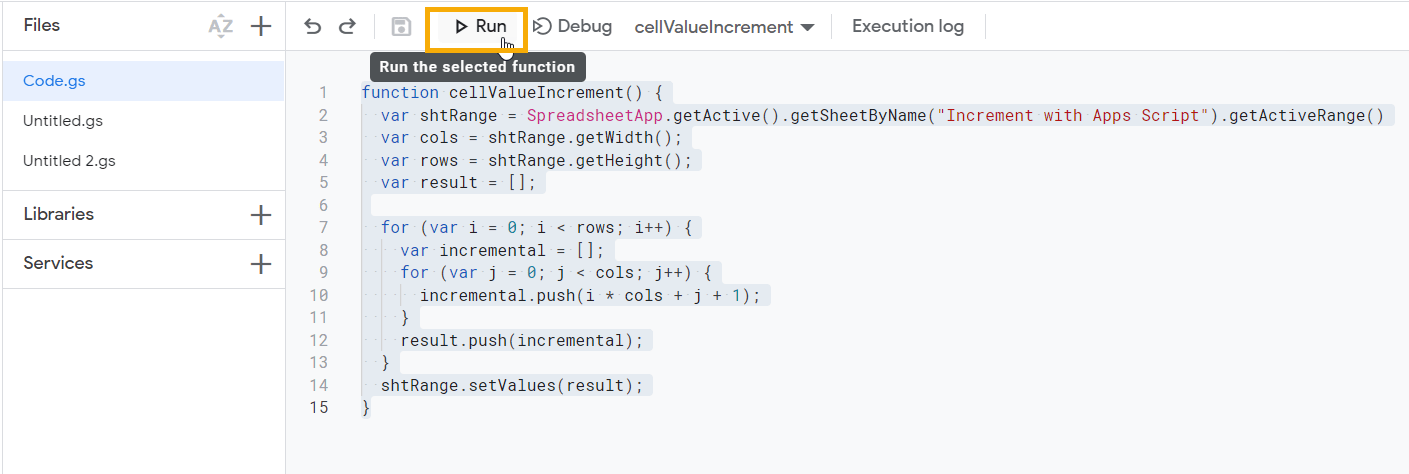
Inside the Apps Script code editor, copy and paste the following code that allows you to increment the cell values by 1 within all the selected cells.
function cellValueIncrement() {
var shtRange = SpreadsheetApp.getActive().getSheetByName(“Increment with Apps Script”).getActiveRange()
var cols = shtRange.getWidth();
var rows = shtRange.getHeight();
var result = [];
for (var i = 0; i < rows; i++) {
var incremental = [];
for (var j = 0; j < cols; j++) {
incremental.push(i * cols + j + 1);
}
result.push(incremental);
}
shtRange.setValues(result);
}
If the lines above make you feel overwhelmed, here’s the detailed breakdown of the code:
1. Every small piece of code you write to automate stuff in Apps Script is a function. Therefore, it starts with a keyword function. You decide the name for the function. It’s common to put a name that describes the task you want to do with this code, so we want to name our function cellValueIncrement.
2. On the second line, you define a variable with the name shtRange. It captures the selected cell range from your spreadsheet and feeds it to Apps Script. In this example, the SpreadSheetApp.getActive().getSheetByName( “Increment with Apps Script”).getActiveRange() method captures the highlighted range.
3. The next two lines store the cols and rows variables representing the columns and rows with the getWidth() and getHeight() methods to fetch columns and rows respectively.
4. To store the incremented cell values, we want to create a blank array and name it result.
5. On the next line, the for loop initiates, starting from row 0 until the last row of the selected range. The identical for loop also runs for the columns because Apps Script understands only two-dimensional arrays.
6. The incremental.push() method allows you to increment the column values by 1 and store the results into a temporary array named incremental.
7. On the next line, you push these incremental values to the result array. The result.push() method is used with the incremental array as the input inside it.
8. Finally, you set the values stored inside the result array to shtRange, and the setValue method allows you to do so.
This way, all the incremented cell values are returned row-wise in your sheet with the name “Increment with Apps Script”
Note: Before running this script, you need to select a few cells for this Apps Script to work. For demonstration purposes, I highlighted cells A1:A11. This way, you set boundaries for the script as it can’t generate the incremented values infinitely – it only returns the output within the selected cells.
Hit the Run button to execute the code. If you are a first-time user of the Apps Script, Google Sheets may request you to authenticate your Google Account.
Once the code runs successfully, you will see the Execution completed message in the Execution log.
As a result, cells A2:A11 are filled with auto-incremented values. This is how you can increment the cell values using the Apps Script to automate the entire process.
Bonus: How to Create a Button That Increments Your Cell Values
You can create a button and link it to the script we created above so that every time you select the cells and click on the button, Google Sheets will automatically run the script and return the incremented cell values.
1. Navigate to the Insert menu.
2. Select the Drawing option.
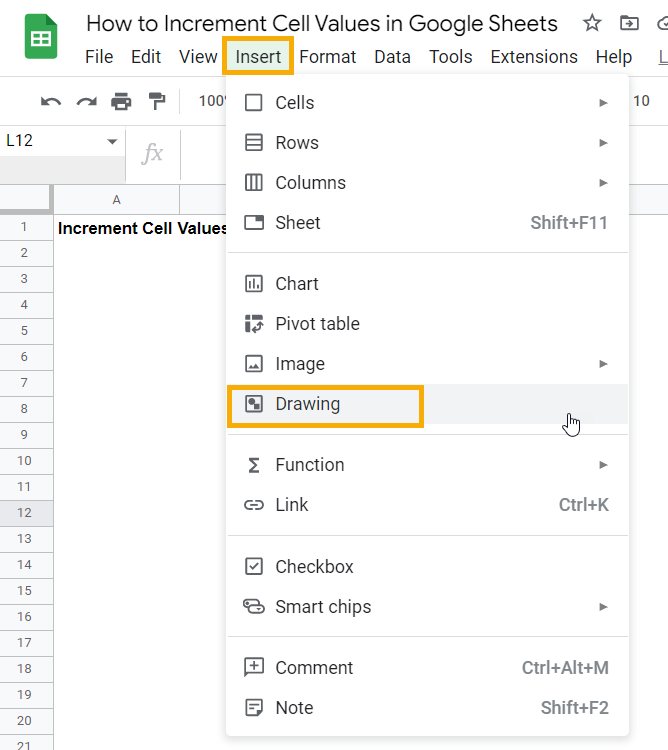 3. Once a Drawing dialog box pops up, select the TextBox option to insert a textbox.
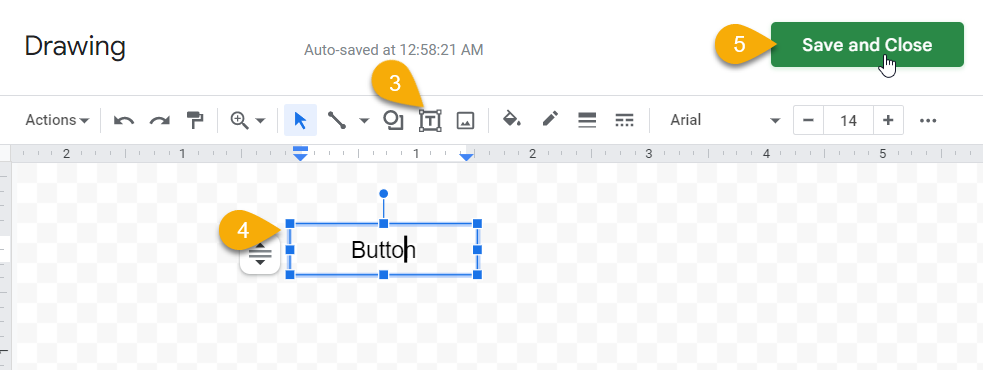
4. Type “Button.”
5. Hit Save and close to save this drawing and make it appear on the sheet.
6. Select the drawing you just created, click on the three dots, and select Assign script.
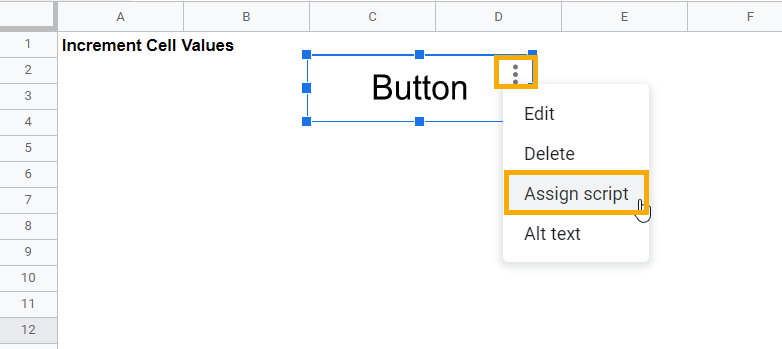 7. In the Assign script window that appears, type “cellValueIncrement” to link our script to the drawing.
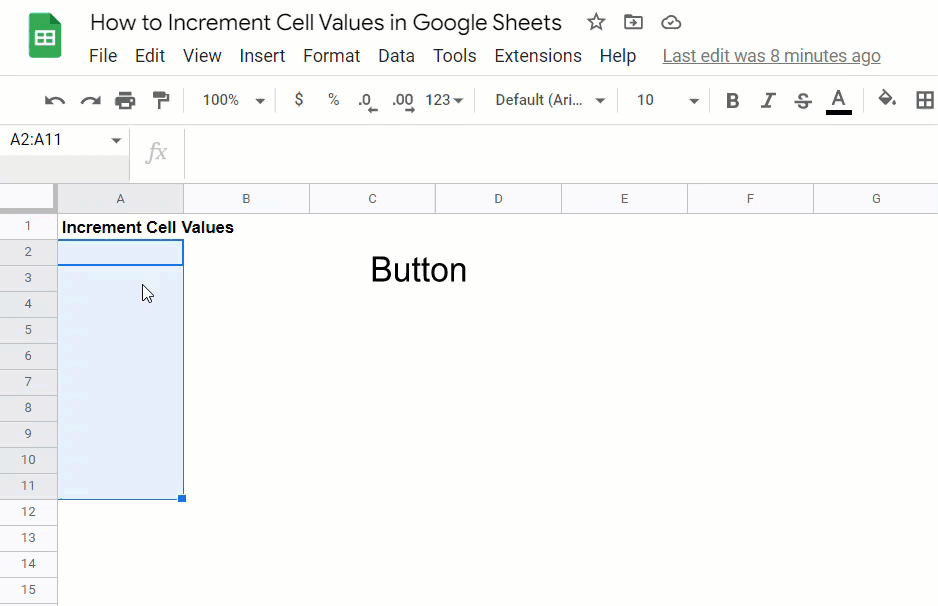
8. Click “OK” to close out.

9. Finally, select the cells you want to fill with incremented values and hit ”Button” to run the script in the backend. And that’s how you do it.
Is there an Increment Shortcut in Google Sheets?
No, there is no shortcut in Google Sheets for incrementing cell values.
