
If you have ever created a table in Excel, you may know that sometimes you need more space to add, for example, a proper title. That’s where cell merging comes into play.
This feature allows you to join multiple worksheet cells into one cell. It may come in handy when you need to use a bigger text block as a header for the content spread across several columns or rows.
However, sometimes merging cells in Excel can be rather troublesome. This step-by-step guide will teach you how to easily unmerge cells in Excel.
Why You Should Be Careful with Merging Cells in Excel
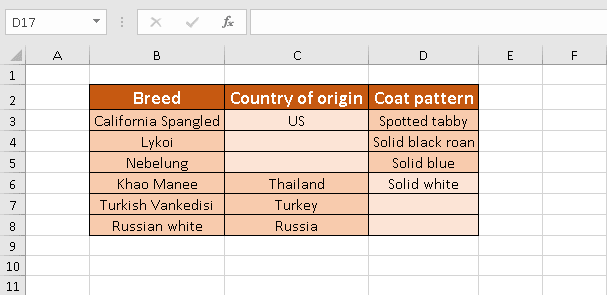
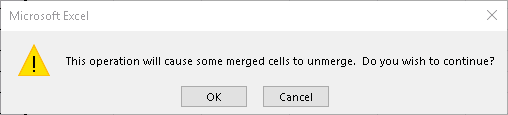
Let’s say you’ve made a table containing some merged cells, and now you need to move it to a different place on a worksheet. If you drag and drop its contents, you might come across this message:

Alternatively, you may receive this warning message:
The thing is that merging cells in Excel has an adverse effect on its functionality and causes a lot of problems in performing even the simplest actions.
Here is an illustrative list of the other functions that can be affected by merging cells:
- Sorting data (you may be unable to filter in Excel as well)
- Creating PivotTables
- Applying formulas
- Running macros
- Using a screen reader
In addition, merged cells might be one of the reasons of the CTRL + F shortcut not working in Excel. If you have already recognized the need to get rid of all your merged cells, one of the methods below can help.
How to Unmerge Excel Cells Using the Toolbar
This way of unmerging cells in Excel is as easy as ABC. Here’s how you do it:
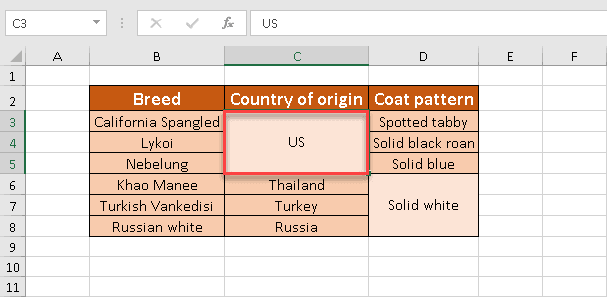
1. Select the cells you want to unmerge.
- If you want to select one cell, just click it.
- If you want to select a cell range, click the first cell, press the left mouse button, and drag the cursor over the other cells you need. Alternatively, simply press and hold down the Shift key while using the arrow keys to extend the selection.
- If you want to select non-adjacent cells, click the first cell, press and hold down the Ctrl key, and select the additional cells.

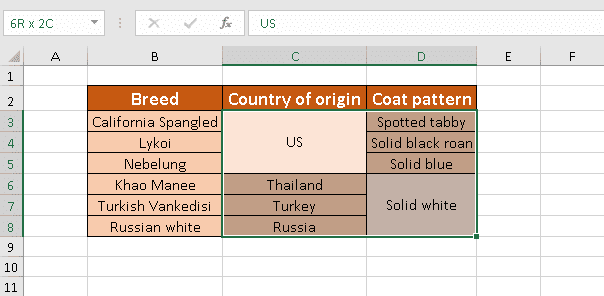
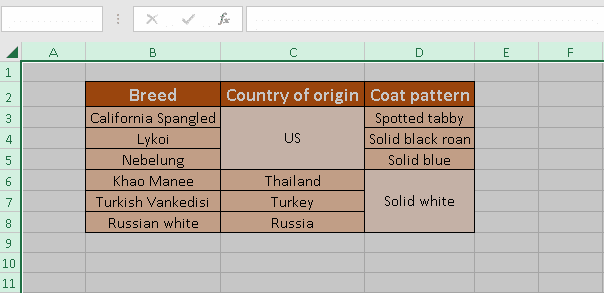
- If you want to select the entire worksheet, press the Ctrl + A combination. We’ve used this option to unmerge all merged cells in our table.
2. Click the Home tab.
3. In the “Alignment” section of the toolbar, click the drop-down arrow next to the “Merge & Center” button.
4. In the drop-down menu that appears, click “Unmerge cells.”
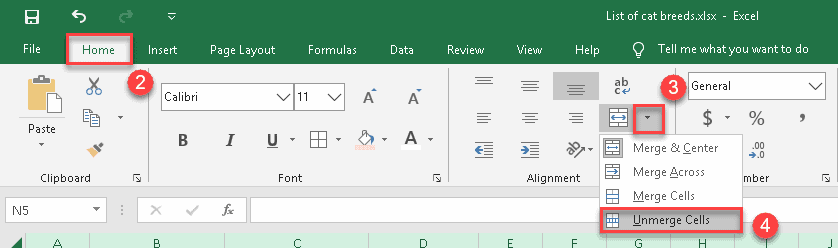
Note: you can click the “Merge & Center” button directly—the result will be the same.
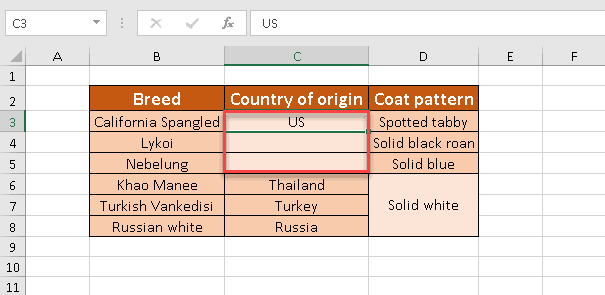
Voilà! Now all the cells we selected are unmerged. Here’s what the final result looks like:
How to Unmerge Excel Cells Using a Keyboard Shortcut
Shortcuts always serve as real time-savers, and this one will provide you with the quickest way to unmerge your cells.
1. Select one or more cells you want to unmerge.
2. Press the Alt + H + M + C combination quickly in a row.
You’re done! See how quick that was?
How to Add the Unmerge Option to the Quick Access Toolbar
Do you often face the necessity of unmerging your cells and want the “Merge & Center” button to be on hand all the time? If so, there’s a helpful lifehack for you!
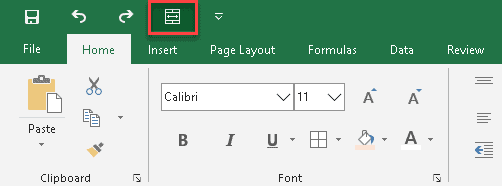
You can add the “Merge & Center” button to the Quick Access Toolbar and have access to it no matter what tab you’re on at the moment. Just follow the steps below:
1. Click the Home tab.
2. In the “Alignment” section of the toolbar, right-click on the “Merge & Center” button.
3. In the drop-down list, click “Add to Quick Access Toolbar.”
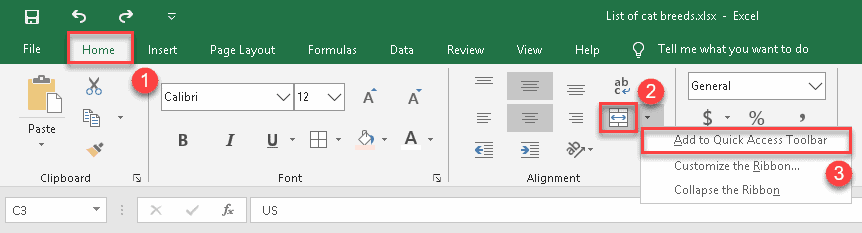
This will add the “Merge & Center” button to the command line above the main ribbon tabs, and you will be able to click it whenever you want to unmerge your cells.
How to Find All Merged Cells Within a Range
If you work with a huge amount of data, it could be really tedious to do away with all merged cells in the worksheet. The task becomes twice as difficult when you receive an Excel file created by somebody else and realize that merged cells are totally indistinguishable from unmerged ones.
No worries—it’s an easy-to-solve problem. Using the “Find and Replace” feature, you can quickly find all merged cells within a selected range.
1. Select the range where you want to look for the merged cells.
2. With the cells selected, click the Home tab.
3. In the “Editing” group, click the “Find & Select” button.
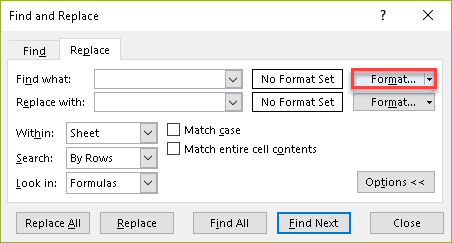
4. Click “Replace” to open the “Find and Replace” dialog box.
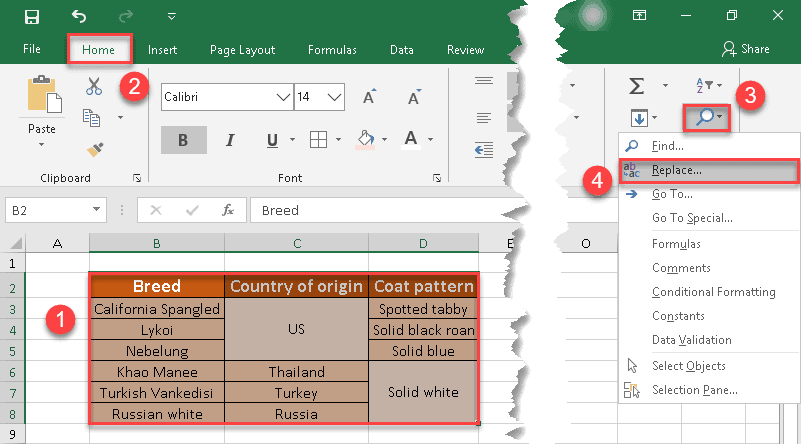
Note: you can also do this by pressing the Ctrl + F keyboard shortcut.
5. In the “Find and Replace” dialog box, click the “Option” button. This will expand the dialog and show you more options.
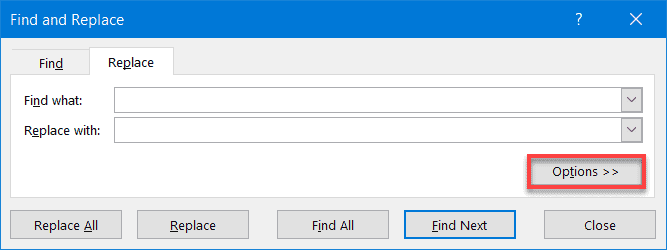
6. Next to the “Find what” field, click the “Format…” button.
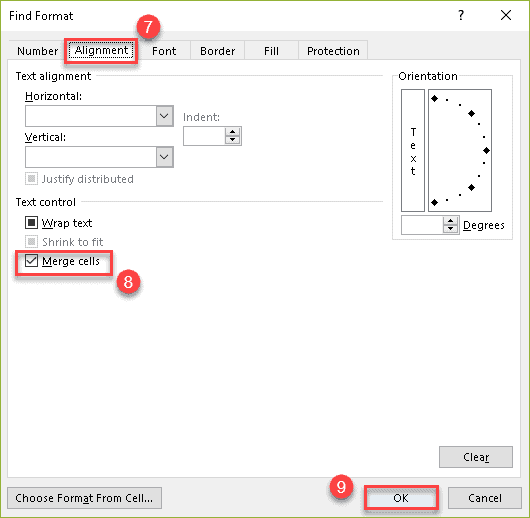
7. In the “Find Format” dialog box that appears, switch to the Alignment tab.
8. Check the “Merge cells” box under “Text control.”
9. Click “OK.”
10. You will be brought back to the “Find and Replace” dialog box. Click “Find All.”
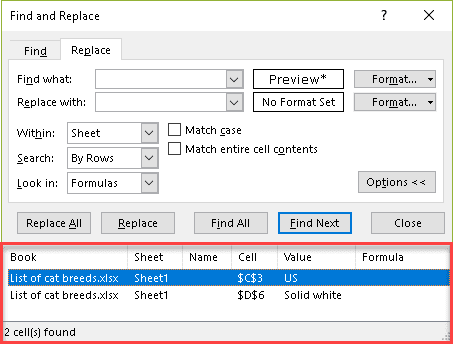
All is set! Now you can see the list of all your merged cells and easily decide their fate.
How to Copy the Original Value to the Empty Unmerged Cells
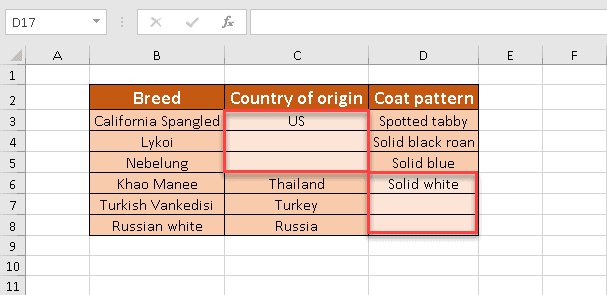
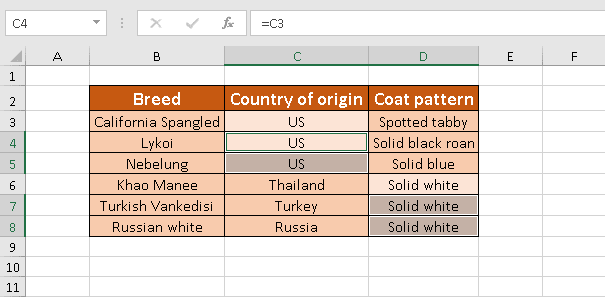
Up to this point, you may have already noticed that when you unmerge cells, all the data go to the top-left cell while the other cells are left empty. It doesn’t look very nice, does it?
Fortunately, with just a few simple steps, you can fill in all the blanks with very little effort.
Step 1. Find All Empty Cells
First, let’s detect all cells that don’t contain any data.
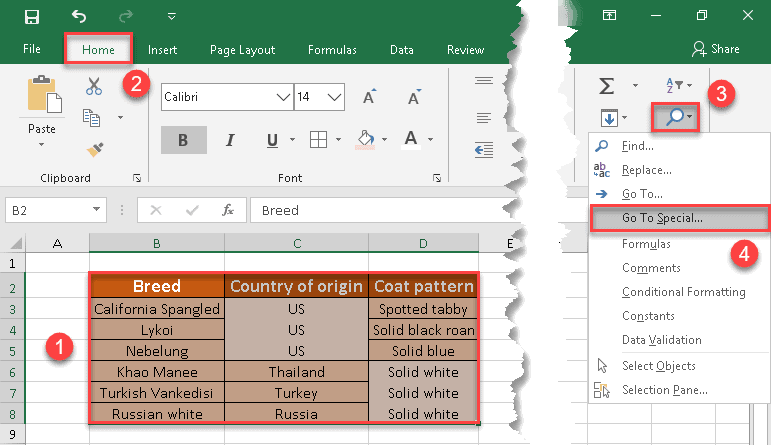
1. Select the range where there are some empty cells.
2. Click the Home tab.
3. In the “Editing” group, click the “Find & Select” button.
4. Click “Go To Special…”
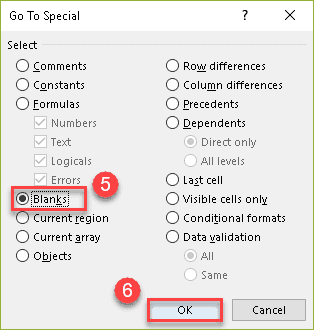
5. In the “Go To Special” dialog box, choose “Blanks.”
6. Click “OK.”
Awesome! Now all empty cells within a chosen range are selected.
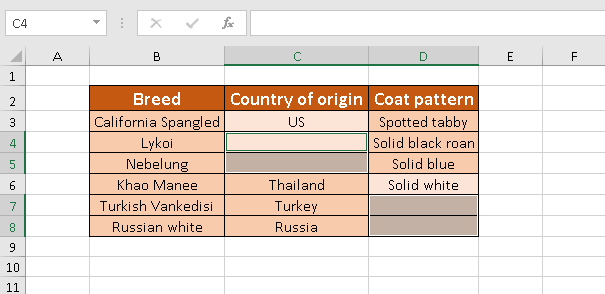
Step 2. Fill Each Empty Cell with the Original Value
It’s high time we put our table in order and set all the data straight.
7. When all the empty cells are selected, type the equal sign (=) and press the Up Arrow key (↑). This formula will copy the data from the cell above to the active cell.
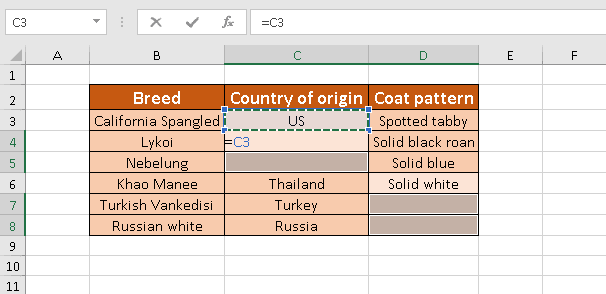
9. Hold down the Ctrl key and press Enter. Now all empty cells will be filled with the data from the cells above.
Long story short, merging cells in Excel is a double-edged sword that can be useful and irritating at the same time.
However, now you have all the knowledge necessary to keep it under control and quickly unmerge cells whenever you want.
